Saturday, January 31, 2009

Garage Epoxy Floor

Can you imagine a garage so empty that you could pressure wash it? Only when moving / before moving in, right? Generally you may not go to these extremes, but in this case it was a necessity...
The previous owner had a large number of cats and took care of the cat box problem by making his own giant sized one and putting it in the garage.

Here is how to duplicate his (genius!) process:

1) Make a large frame of 2x6 lumber with a scrap of vinyl flooring for a bottom
2) Put box in the middle of one garage bay
3) Fill it with cat litter and ignore until you move...
So you can see why pressure washing was needed.

Oh! Least I forget - when the garage floor was poured in 1977, kids were allowed to walk, ride bikes, draw and play games like tic-tac-toe in the wet concrete. What fun! The gift of permanent pre-pubescent lithic art!

So what to do about this two pronged problem? A smell better left to the imagination & chasms carved into solid concrete by prehistoric preteen Morlock sub creatures?

The answer to both was sealing the well-defiled floor. There are several DIY epoxy products available on the market. A 2 part, 2 1/2 gallon "pro" epoxy kit sized for the typical two car garage was selected - it also came with colored paint flakes to be sprinkled on the wet paint.

This was the process: Pressure wash the garage floor thoroughly. Be sure to use a very high powered gas pressure washer and run the motor constantly for the entire 1 day rental period. (Get full use of the rental by pressure washing driveway, sidewalks, and curbs.) No other pressure washer is loud enough to allow you to meet your neighbors while making a great first impression! Do avoid hitting the sheet rock on the walls as even a casual flick of the wand will rip a hole right through it. Next, allow the concrete to dry. Attempt to fill cracks, craters and other gouges in concrete with vinyl concrete patch. Abandon fruitless effort (next time fill with liquid epoxy mixed thin enough to self level?) allow to dry, proceed to next step. Mask edges and wood expansion joint between the two car bays. Divide the color chips into smaller quantities to ensure that there will be enough for the entire floor / to make sure coverage is reasonably even. Mix epoxy in 5 gallon bucket. Brush edges, roller epoxy onto floor, spreading color chips as we (Thanks Dad (pictured) and Greg!) painted our way out of the garage.
That is all there is to it! Sure the more aggressive prep methods might be indicated if the floor has a lot of oil or grease embedded, but so far so good! The concrete patch may not have done more than fill the deepest of the gouges, but the epoxy paint and color chips did a pretty good job of camouflaging things. And the overpowering olfactory reminder that the garage was once a temple to the end result of feeding and confining cats? Gone!

Tuesday, January 27, 2009

Oak Column Plant Stand

This one happened fairly easily - it isn't a very big project - less than three feet tall, with a top just nine inches on a side.
It started like this: David and I were hanging out in his living room not many days after he proposed to Claire. I mentioned that I would like to make something for him. He said "There is one thing I would like" and brought out a plant stand that was made 90 to 100 years ago by his Great-Grandfather. It was made of Oak, with a fairly dark / darkened finish. I took measurements and made a sketch then and there. And within the week started to work on it. This is the perfect kind of project for a smaller shop craftsman to work on. There is nothing better than building something that your customer can't just buy from a catalog.

Design: purely dictated by the existing piece I was trying to match. Four tapered boards make up the column, the top and bottom are both made of two boards tongue and grooved into each other. 3/4" Cove molding dressed the top and bottom of the column. Nothing too difficult. The final part was to make two full-size patterns of the tapered pieces - 3 pieces of graph paper taped together for each, with the elongated regular trapezoid shape cut out of each. Why two? The second had to allow for the thickness of the wood of the wider sides. There are four small feet, also wood under the bottom board so that if things do get too wet, the stand won't be sitting too deeply in a puddle. Also note that the top and the bottoms are square to each other and exactly the same nine inches square in size - sure looks like the top is bigger in the photos, huh?

Construction: First stop was Woodcrafters for the Oak - I had some quartersawn in stock, but wanted grain that came close to approximating the original. So I went looking for relatively small cathedral grain for the wider sides. Woodcrafters obliged. At a bit over 26 inches tall, there isn't a lot of wood in making one of these & after bringing a long board to the desk I was talked out of buying it by the clerk. I was chatting with him about what it was going to be used for and he mentioned that they also had a bunch of shorts available. I went where he directed, and sure enough, found even prettier pieces in the short bin. Once back home (and after I had jointed and thicknessed the wood to 3/4" that I planned for) I laid the larger of the two templates on the wood, looking for the prettiest grain. Once found, I lightly traced the outline on the wood in pencil, and started looking for the rest of the pieces in the wood. Oh! As is obvious from the photo, at some point it was decided that I should make 2 of these stands - someone else saw my sketch & asked if I would make one for them as well. As it isn't twice as hard to make 2 or more of something when you are already set up to make 1, I readily agreed. The photo is interesting because it shows the grain flowing from one stand to the next. As I laid out the tongue and groove tops and bottoms as one long board, it wasn't a surprise for this to happen. Once cut into 4 pieces, I used the prettiest two for tops - what you see are the less visible bottoms, which are even less visible with the molding applied.

One good trick to share for cutting - the angle of each side is just 2 degrees. I used a Wixey digital angle gauge to do a couple of the cuts - I zeroed the gauge my tablesaw top, then I laid my angle cut jig on its side on the tablesaw, and adjusted it until it read exactly 2 degrees. This technique would work for any taper cut such as table legs. Kinda cool for those times when the eyeball alone isn't good enough. A related tip - the battery in the Wixey is the same size used by LED tea-lights. So, if your battery dies it might be cheaper to buy a pack of those for a dollar or two than a replacement battery alone for Six dollars!

Most of the angle cuts were done with a template and carpet tape as most of the grain I wanted wasn't aligned in any way with a board edge. Assembly was relatively straightforward - using offcuts as clamping cauls, Titebond III for the glue up, etc.

The only tricky part was back-sanding the molding to conform to the column taper. This was only necessary for the molding on the bottom. Finished with tinted water-based Poly (it is a plant stand, it Is going to get wet) in a reasonably close shade, covered with a clear gloss water-based Poly of the same brand. I also made sure I turned the project over and sealed the feet and bottom of this stand too. If there is the slightest chance of it ever standing in a puddle, it may as well have a fighting chance. I rubbed out that final clear coat with very fine steel wool to give it more of a semi-gloss finish. A simple but attractive stand. My hats off to David's Great-Grandpa!

Sunday, January 25, 2009

Murphy Bed Project


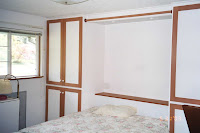
This is a nice built-in project that Greg and I did for our folks 6 years ago. This Murphy bed wall system was installed in Mom's sewing room so that they would have a good-sized guest bed for an approaching family reunion. Plus, Mom needed additional storage for fabric and sewing supplies. This post is about the details of how and why the project happened like it did.
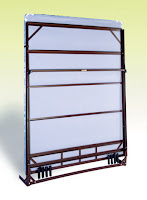
Initially the folks looked at buying a Murphy bed type solution with storage from one of the local companies that specialize in bedrooms, closets and other built-ins. Unfortunately, none of the systems had deep enough cabinets and the best of what was offered wouldn't fit the space very well. Ended up buying the Queen size bolt to the floor version of the original Murphy Bed mechanism and designing and building the cabinets ourselves.
Design:
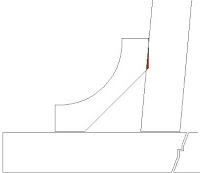
Designing the cabinets was fairly straightforward - the internal shelves were sized vertically to fit the clear plastic tubs Mom uses to store fabric & the width of each side cabinet was dictated by the size of the bed and the width of the wall. Depth was determined by existing window placement. Enough clearance was left so that the window doesn't look off center or out of place in the room & so the doors next to the window opened well. The bottom and middle shelves between the upper and lower doors are fixed, the rest are adjustable. 6 nearly identical rectangular frames were used - 2 support the bottom shelves (and to provide for a toe-kick just taller than the baseboard molding) 2 support the middle shelves and the other two keep the cabinet square at the top. The 4 side pieces are 3/4" hardwood plywood with a birch veneer on one side and a maple veneer on the other, with 1/4" shelf peg holes spaced every 2". Above the bed frame is a simple rectangular bridge, lipped internally to support a floating panel with a couple of puck lights controlled by a light switch at the head of the bed. The headboard is removable as it would be in the way with the bed in the storage position. With the original Murphy Bed mechanism, legs supporting the foot of the bed automatically deploy as the bed is lowered into position. Kinda cool, but what that means is that the only standard way to conceal the bed when it is in the upright position is with doors - which would get in the way and give the head of the bed too much of a cave feeling while it was being used, as the deeper side cabinets would prevent the doors from folding the full 180 degrees. Even bi-fold doors wouldn't work for what the folks wanted. We could have solved the problem by bringing the bed further into the room so that the front of the stowed bed / middle cabinet would be proud of the side cabinets so that the doors could fold back (many of the standard designs are like that) but that would have made it a bit harder to get around the end of the bed when it was down, and make for a cramped guest bedroom. Instead, we put a groove in the front edge of the top bridge, and made a slightly taller than toe-kick height base board with an identical groove which accept 2 lightweight melamine face 1/4" pieces of plywood. The closet rod was added latter as a bar to display quilts.
Construction:
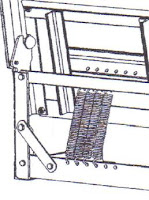
As the carpet was to be replaced, we pulled it back from the wall where the Wall-bed system was going, removing the tack-strips and molding. We left the carpet in place on the rest of the floor temporarily, to act as a built-in padded drop cloth. We cleaned and painted the wall and repaired the damage left by the tack strips. The bed mechanism was to be bolted to the floor, but as there was still going to be carpet in the room we used a piece of plywood roughly the same thickness as the new carpet and pad between the mechanism and the floor. We measured off exact center and installed it with just 1 additional inch over the minimum distance to wall. Bolting it down was accomplished with the lag bolts that were not provided with the bed kit - too many types of floors to anticipate them all. The parts installed in relatively large pieces, installing each tensioned spring required the most muscle.
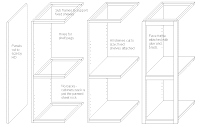
All 4 plywood sides were cut to the exact same size on the Home Center's panel saw before leaving the store. Assembly was very straight forward, but had to be done in-place as the cabinets were completely floor to ceiling. As the frames gave good support, very few screws were used to attach the cabinets to the walls. (It was very nice that the bed mechanism didn't rely on the cabinets for support - just the bolted floor connection. We had contemplated a home-built counter-weighted mechanism, but time was an issue & a counter-weighted mechanism would have required much beefier side cabinets.) The small face frames were attached with brads and glue. The cabinet doors were more time consuming to construct than the rest of the project. It was our first attempt at making floating panel doors and all 8 of these are rather large - nearly 4 feet tall each. They are attached to the cabinets with Grass brand European style hinges, which are quite adjustable. The cabinet itself is finished with several coats of a smooth flowing, white gloss oil based paint. It was rolled and brushed on by Dad but does not have a brushed look. It flowed and leveled itself so well it has a sprayed professional appearance. The oil paint did smell strongly and took a few weeks to fully cure / have the smell dissipate. White was selected to give what is usually a sewing room a bright appearance.
The molding that was installed on the now hidden wall was cut and moved to the toe-kick of the new built in cabinet. 1/2" Quarter-round was used to trim the cabinet to the ceiling as the rest of the room was left without crown molding. The headboard has a lighted switch for the puck reading lights and outlets for additional lights / radios / alarm clocks. The overhead bedroom-style light was eventually replaced with a florescent fixture.

Use:
The room's primary purpose is a sewing room. There is a large central layout and cutting table and two cabinet sewing machines. Only the table has to be folded and rolled out of the way to use the bed. The two center panels are removed and stored - they are thin and lightweight. The bed is pulled down, a band is removed that keeps the mattress from shifting while it is stored. The headboard is put into place and the bed is made up with fresh bedding for guests. A quick process to transform a sewing room into a guest bedroom. Oh, they also have a picture hung over the bed, which completes the look.
Thursday, January 22, 2009

Queen bedframe

My personal taste in furniture is mostly Eastlake, Craftsman / Mission / Greene and Green, and Shaker styles. I also like modern derivatives and interpretations like those available from studios like these: NW Fine Woodworking, The Joinery, and Thos. Moser.
The pictured bedframe with drawers (and legs!) is a product of Whittier Wood Furniture a Eugene Oregon company, which offers unfinished and flat-pack ready to assemble furniture.
I was first exposed to Whittier's products through Fred Meyer, a local we-sell-everything chain. I've even finished and assembled a few of their products - all well made, all out of good wood (generally Alder) and nicely veneered plywood. Their products hold up very well - it is real furniture. A bargain if you can apply a decent finish yourself, or buy one of their pre-finished pieces like the above bedframe. I recommend their work as a better alternative to anybody considering buying particle board from IKEA.
However in this case I want something a bit different, more in the Craftsman style. Fumed quarter-sawn Oak instead of cherry finished Alder, and instead of 6 ball-bearing glide drawers, probably just 3 pull-through drawers resting on UHMW runners, so no matter how you position the bed (against one or another wall, etc.) you'll still be able to get at the contents of the drawers. I like the drawers for storage of extra bedding, not for daily use in place of a chest of drawers. The extra bed height I've always liked, so that isn't an issue for me. I also like the legs rather than just having the drawers rest directly on the carpet.
I still need to figure out exactly what I want for a headboard & how to balance style with functionality. I really enjoyed the bookcase-with-lights headboard I had on my waterbed back in the early 80's, but by my current standards it was pretty hideous. Any suggestions?

Wednesday, January 21, 2009

Dovetail Saw, replacing a broken handle.

The web is a great resource for woodworkers - I got a fairly nice unlabeled old Dovetail saw from a garage sale / tag sale very inexpensively - because the handle was broken. Web to the rescue!
Here are some good resources for replacing the handle on any saw, but most especially smaller back saws that have a stiffener down the spine / back of the blade.

http://www.leevalley.com/newsletters/Woodworking/1/5/article3-3.htm

http://wenzloffandsons.com/saws/kits/index.html
This family operation is only 14 miles away from me & are medium famous for their great saws.

http://www.norsewoodsmith.com/node/68
Also available as a PDF, this guy shows you how to make a complete backsaw from scratch!
http://www.norsewoodsmith.com/files/image/backsaws/pdf/Backsaw_Project.pdf

http://www.backsaw.net/cpg/thumbnails.php?album=7


Note that the handle pictured isn't mine, just my personal favorite of all those I saw (snork) and what I aspire to.