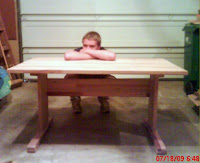
 This is a computer desk that my son Edward made for his Mother's 50th birthday. A simple trestle design, and sized to fit a particular space, this was something that she had been wanting.
You can see that it is glued up from strips of wood (hardwood, mostly Oak) and fairly thick. The wood was purchased from a guy advertising "12 inch wide Oak boards." Of course I got excited and made the 45 minute drive without asking enough critical questions. Even though the product wasn't exactly what was mentally pictured when I read the Craigslist ad, I still left with the little pickup loaded with boards. These boards are tongue and groove and look like oversized pieces of flooring. They were made to be installed as flooring and rub rails for the trailers of tractor/trailer long-haul trucks (strong enough for forklifts to drive on.) They are finger-jointed, but the finger-joints are on the sides of the planks instead of the face, so not very noticeable.
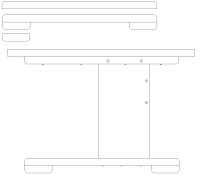
 The design is pretty simple. The top is glued up of 3 pieces (after the tongue and groves were cut off as they weren't precise enough to use.) The legs and the stretcher are cut from single boards, and the feet and battens are cut from smaller pieces of the same material. All of the exposed edges were softened / mildly rounded using a random-orbit hand-sander, except for the exposed end-grain of the legs and stretchers which have a much larger radius round-over. We wanted a design that would be easy to build, move / transport and if needed, easy to store. Also, although we would have liked to use a through-tenon on each end of the stretcher, it wasn't something we wanted Ed to tackle on his first large project.
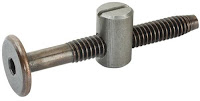
Instead, we used cross-dowel nuts to attach the modesty panel/trestle/stretcher. We got the idea from a pair of work benches brother Greg made (using regular nuts and bolts as the larger cross-dowel nut sizes are uncommon.) A little industrial but look OK & is very solid. The battens are secured to the desktop with screws and glue, with glue just on the middle of each piece: although we don't expect much cross-grain wood movement, it didn't cost us anything to allow for it.
The battens and the feet are cut to the same width, and the battens are through-bolted to the legs. We used nylon-bushing locknuts to make the connection. A good change would have been to use thicker battens to make using socket wrenches easier as the nuts and bolt heads are very close to the bottom surface of the desk. The legs are secured to the feet with long square drive screws.
Ed finished it by brushing on coats of clear semi-gloss Minwax Poly: 3 coats for the top, 2 coats for the rest of the desk. Fine grit hand-sanding and triple-aught "000" degreased steel wool to knock down nibs, bubbles, etc. between coats. Another thing that we would change if we were doing it over again would be to pre-finish (at least 1 coat) the pieces before assembly.
The desk was a success (his Mom loved it) and it was a lot of fun helping Edward get his first large project completed.
As this will primarily be used as a laptop desk, Ed's next project / present for his Mom will be to make a back-of-desk-organizer, with pigeon holes for paper and other supplies.


No comments:
Post a Comment