 Today (out of a box of tools labelled "50 sents each") I got a reciprocating saw-blade holder. Really, just a handle that would let you use Sawzall blades as a small handsaw. This one was made by Craftsman, and except for the missing thumbscrew to secure the blade is in great shape. Of course I tried to track it down, but it either came as an included accessory of a reciprocating saw, or wasn't deemed worthy of maintaining parts for (the plate that grips the blade is trapped / non-removable, so the only replacement part *IS* the thumbscrew.) No matter, my local ACE hardware has a ton of bolts and thumbscrews, so an easy fix.
Took the handle to the store and using the bins of bolts determined that it was 1/4", 20 tpi (threads per inch.) Second step was to decide what sort of head I wanted - wing nut, thumbscrew, slotted, hex drive with round knurled side - lots of options. Having no idea what the original looked like (although I'm guessing low-profile knurled edge, coin-slot to tighten so as not to get in the way) I decided on a thumbscrew. I may have gone with something with a lower-profile head, but this handle can be used to grip the blade either way - straight up, or flipped 180 degrees, so if a thumbscrew would get in the way one way, I could simply remove and flip the blade and retighten and be back in business.
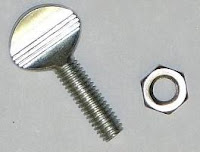 ACE "only" had 2 lengths in the thread size that I needed - too long, and even longer. I really only need 3/8" of threaded length and leaving it long would have gotten in the way even worse. So, in addition to the thumbscrew, I also bought a stainless steel nut of the right size, and a couple washers. Sure, I probably have those, but rather than finding them in the garage, it was easy to spend the extra 20 cents to save time. After I got home, I slipped the washers onto the thumbscrew and tightened down the nut - the threads under the washers and nut were about the length that I wanted. If I wanted to leave any longer length of threads, I would have bought 2 nuts and not bothered with the washers and simply tightened the nuts against each other. I then used a hacksaw (although using my reciprocating saw would have had a certain poetry to it) to cut off the extra threads. The next part could be accomplished with a hand file, but I wanted this tool to cost less than buying one new (time is money) so I used a bench grinder to smooth the end of the threads up to the stainless steel nut. Depending on how good your hacksaw job is, this can be pretty painless & accomplished quickly without the need for quenching.
 ACE "only" had 2 lengths in the thread size that I needed - too long, and even longer. I really only need 3/8" of threaded length and leaving it long would have gotten in the way even worse. So, in addition to the thumbscrew, I also bought a stainless steel nut of the right size, and a couple washers. Sure, I probably have those, but rather than finding them in the garage, it was easy to spend the extra 20 cents to save time. After I got home, I slipped the washers onto the thumbscrew and tightened down the nut - the threads under the washers and nut were about the length that I wanted. If I wanted to leave any longer length of threads, I would have bought 2 nuts and not bothered with the washers and simply tightened the nuts against each other. I then used a hacksaw (although using my reciprocating saw would have had a certain poetry to it) to cut off the extra threads. The next part could be accomplished with a hand file, but I wanted this tool to cost less than buying one new (time is money) so I used a bench grinder to smooth the end of the threads up to the stainless steel nut. Depending on how good your hacksaw job is, this can be pretty painless & accomplished quickly without the need for quenching.
I then removed the nut and washers, and did a trial fit. Note - one of the main reasons for putting the nut(s) on is so that you can keep the threads clean / relatively burr free. Simply removing the nut slowly can clean up / chase the threads a bit for you. That is why I spent the extra couple of cents on the stainless steel nut - as it was a bit harder than the thumbscrew, it was adjusting it, rather than the thumbscrew adjusting the nut. If there was room for 2 nuts, I wouldn't have bothered with stainless steel. Trial fit - a bit long. Replaced the nut without the washers and got a cube of ice from the kitchen. Too short to make an adjustment cut with a hacksaw, I would have to grind off about the thickness of a washer. Tightly trapping the "thumb" part of the screw between my thumb and cradled ice cube, I ground off what I needed, rounding a bit this time to allow easier insertion. I got the idea for using ice for grinding from Frank Ford's Frets.Com website. Thanks Frank! It works great! The whole site is interesting / useful, but his shop tips are wonderful.
To conclude - even if a part isn't available, there isn't any reason you can't find (and adjust) something into a suitable replacement. A minimum number of metalworking tools you should already have (hacksaw, bench grinder, files) will get you there most of the time. Ice is wonderful for grinding & will prevent you from removing temper and/or keep you from burning yourself. A well stocked local hardware store is worth its weight in... ...broken tools that would otherwise be binned or recycled. If it is a complex part, try the manufacturer first, generally through their website.


 Posts
Posts

