Sunday, August 23, 2009

What is it?

I picked up this tool at a garage sale yesterday for a couple of bucks. The old gentleman that was having the sale was in his 70s or 80s and had a number of tools that were his father's - including a handsaw with a nib that just wasn't in good enough shape to turn back into a user, but was most likely over 100 years old. The pictures are of a tool that he couldn't identify, but that my eyes passed over until someone else asked him what it was. I had a guess at it & snagged it, just because it was a fun artifact. Other than lightly cleaning it I didn't do anything else to it. My teenage son used it successfully and quickly the very first time - the tool functions like new!
Of course I had to try it & was amazed that it works better than modern replacements. As you can see, it has a point on the end, and an adjustable double-sided cutter that is set with a thumbscrew. The thumbscrew locks the cutter to the shaft of the tool. The cutter isn't particularly sharp, and is an arc, coming to a single point. Frankly, I don't think the cutter was any sharper when it was brand new. I showed my parents thinking that there was a chance that they wouldn't be able to identify & my Mom said that her Grandmother had one that she used all the time. She also said that they fell out of favor after the war (WW2) and that she hadn't seen any since then.
So, my question to you is: what is it? Instead of giving the answer away, I thought I'd give you a puzzler. If you know the answer, please don't post as a comment. email me with your guess and I'll send you a picture of it in use, or give you a hint if you are wrong - or heck, will just send you a pic / tell you if that is what you would prefer. Hope this is fun for you!

Saturday, August 22, 2009

Fein MultiMaster

I finally got a Fein MultiMaster - it has been on my wish list for many years. But, the price has prevented me from buying and Santa from delivering. It has a lot of capabilities, which has lead to a number of manufacturers making less expensive knock-offs in the last year.
This is the model with case I bought, but I didn't pay $399 for it! I bought it at (of course) a garage sale for $25. Yep, pretty good deal, right? Hold on a second - check out how expensive the BLADES for it are! Yeah, a major stumbling block for me. Fortunately, there are a few options. I'm sure some of the competition's blades and accessories will fit & I can always make my own. Yep, there are some brave souls out there that have made their own blades for this tool, which may make it more affordable for me to own and use. I know we sure could have used it on a recent bathroom remodel.
Dana Decker's method is pretty much the standard way folk are going about it. This guy does much the same thing, but without having to melt the mounting hole. I'll probably end up trying both at some point as I really can't see shelling out more for blades than the tool cost me initially.
There are a few folk that sell somewhat cheaper blades - Multiblades and Imperial Blades appear to be the most popular. But if you need a Bimetallic Metal Cutting Blade you'll have to buy Fein's, as no-one else makes them.
I guess this post is mostly a tool gloat, but I hope someone else out there stumbles across this post and is able to save themselves some money keeping their Fein MultiMaster on the job.

Friday, August 21, 2009

Saving Woodworking Articles for later viewing, Part 1


The web is great - I'm sure we've all found a lot of information that we can't live without, surfing around. Sometimes you will find a really useful article that you don't want to lose track of, and are a little afraid about finding it on the 'net again. Sure, you could print it, but the images lose their crispness and much of the detail.
Internet Explorer can help you out. You can save entire webpages for offline viewing, here is how:
When you use viewing any webpage, go to the File menu and use the Save As... option - choose a desination and name, but select the "Web Archive, single file(*.mht) as the Save as type: - this will create a file with all the pictures that can be viewed offline, backed up to CD and stored, whatever. There are other methods for saving webpages, but only this one puts everything into one file. I think you are fine about doing this for your own use, but I'm not sure about the legalities about sharing .mht files with others. Remember, this only works with Internet Explorer. Whoops! I'm wrong! There is support for MHT / MIME HTML files in other browsers. I wish I had known about this feature a few years ago - I stumbled across a guy that made a pair of Stickley style recliners out of flame figured Maple, with good pictures of each step of the process... ...and could never find the page again.

Monday, August 17, 2009

Shelf life and product code dating

Titebond in all the different flavors is my favorite family of wood glues. Franklin gives a standard shelf life of 1 year for all their glues for an unopened container. Keeping air out of the container helps, but still begs the question: When does that timer start? When was that bottle of glue made / when does that year start? That question is equally applicable to any finishing product.
It basically comes down to lot numbers. Lot numbers are generally stamped in easily smudged numbers on individual bottles, but if not there, then is printed on the cardboard box the bottles come in - thank goodness many stores only unbox a few bottles at a time and the rest stays easy to date from their birth certificate on the box. Quoted from www.titebond.com:
"How do I read the lot numbers?
The letter "A" is always used at the beginning of a Franklin International lot number. The second digit corresponds to the last number of the year. Digits 3 & 4 correspond to the months of the year. The 5th and 6th digits correspond to the day of the month the product was made. Lastly, digits 7 through 10 are batch numbers. Therefore, a Titebond product with the lot number of A906010045 was manufactured on June 1, 2009."
It turns out that there are more ways of coding Titebond Lot numbers than the above, as talked about here.
So, it comes down to tracking down (and deciphering) what the lot numbers mean to determine product age - marking a products "born on" date isn't as useful as marking when it goes bad, which I recommend that you do "in the clear" with a Black indelible marker! Especially if you have to get the "born on" date from a box that stays in the store. If you can't be bothered, buy from some place that does brisk business and date from when you buy the bottle. Otherwise, beware of that dusty bottle purchased from a Mom and Pop - sorry, I like to support Mom and Pop operations, but your project depends on its life based on the glues and finishes it is made with.

Thursday, August 13, 2009

MSDS - why you need them.

A MSDS (Material Safety Data Sheet) is a form produced by the manufacturers of all most all chemicals. Large businesses are required to have the MSDS information at hand for any of the products they use in their daily work. So why do you need them for the products you use? Well, mostly you don't, but I can give some compelling reasons to seek them out.
1) MSDS list the ingredients of the product you are using. Yep, ever wonder what was in some of the finishes you use? An MSDS will tell you, down to the percent. Poor labelling of consumer packaging no longer has to stop you from knowing exactly what you are exposing yourself to, or for that matter whipping up some of your own if that is cheaper for you. Many manufacturers rely on the "Secret" of what is in their stuff to stay in business.
2) The real purpose of MSDS sheets; safety - it is always good to know what you are being exposed to. Everything from alergic reactions, wondering how to store safely, or is it safe to mix with another product, etc.
Here are a few to get you started.
Rockler provides MSDS for the chemicals they sell and even have a nice search engine. As they sell the Sam Maloof finishes, kinda interesting reading!
Highland Hardware also has a list of MSDS for what they sell.
MSDS online is a pay service, but allow trial use, so if you have one in particular that you are interested in looking up, this may be your best option.
Oh, and I've noted that even if a .COM company doesn't have MSDS sheets online for the public, sometimes the Canadian version of the same company / site will.
Another tip - sometimes you can get the information you need simply by asking for it, either by mail, phonecall or webform. "I need the MSDS information for product X, please." Will generally get the job done. I like the "Contact Us" webforms that most companies provide for their sites.
This may be another good way to track down info.
So if your interest is simply casual (What is in this stuff? / Can I make my own version more cheaply?) or because you have concerns (Last time I used this stuff, I got a rash.) the right MSDS is where you need to go for the answers.

Saturday, July 25, 2009

Tool repair: Hacksaws, Bench Grinders and ACE Hardware

As a known estate and garage sale habitué, it shouldn't surprise anyone that more than half of my tools are less than new & are sometimes purchased in need of love.
Today (out of a box of tools labelled "50 sents each") I got a reciprocating saw-blade holder. Really, just a handle that would let you use Sawzall blades as a small handsaw. This one was made by Craftsman, and except for the missing thumbscrew to secure the blade is in great shape. Of course I tried to track it down, but it either came as an included accessory of a reciprocating saw, or wasn't deemed worthy of maintaining parts for (the plate that grips the blade is trapped / non-removable, so the only replacement part *IS* the thumbscrew.) No matter, my local ACE hardware has a ton of bolts and thumbscrews, so an easy fix.
Took the handle to the store and using the bins of bolts determined that it was 1/4", 20 tpi (threads per inch.) Second step was to decide what sort of head I wanted - wing nut, thumbscrew, slotted, hex drive with round knurled side - lots of options. Having no idea what the original looked like (although I'm guessing low-profile knurled edge, coin-slot to tighten so as not to get in the way) I decided on a thumbscrew. I may have gone with something with a lower-profile head, but this handle can be used to grip the blade either way - straight up, or flipped 180 degrees, so if a thumbscrew would get in the way one way, I could simply remove and flip the blade and retighten and be back in business.
ACE "only" had 2 lengths in the thread size that I needed - too long, and even longer. I really only need 3/8" of threaded length and leaving it long would have gotten in the way even worse. So, in addition to the thumbscrew, I also bought a stainless steel nut of the right size, and a couple washers. Sure, I probably have those, but rather than finding them in the garage, it was easy to spend the extra 20 cents to save time. After I got home, I slipped the washers onto the thumbscrew and tightened down the nut - the threads under the washers and nut were about the length that I wanted. If I wanted to leave any longer length of threads, I would have bought 2 nuts and not bothered with the washers and simply tightened the nuts against each other. I then used a hacksaw (although using my reciprocating saw would have had a certain poetry to it) to cut off the extra threads. The next part could be accomplished with a hand file, but I wanted this tool to cost less than buying one new (time is money) so I used a bench grinder to smooth the end of the threads up to the stainless steel nut. Depending on how good your hacksaw job is, this can be pretty painless & accomplished quickly without the need for quenching.
I then removed the nut and washers, and did a trial fit. Note - one of the main reasons for putting the nut(s) on is so that you can keep the threads clean / relatively burr free. Simply removing the nut slowly can clean up / chase the threads a bit for you. That is why I spent the extra couple of cents on the stainless steel nut - as it was a bit harder than the thumbscrew, it was adjusting it, rather than the thumbscrew adjusting the nut. If there was room for 2 nuts, I wouldn't have bothered with stainless steel. Trial fit - a bit long. Replaced the nut without the washers and got a cube of ice from the kitchen. Too short to make an adjustment cut with a hacksaw, I would have to grind off about the thickness of a washer. Tightly trapping the "thumb" part of the screw between my thumb and cradled ice cube, I ground off what I needed, rounding a bit this time to allow easier insertion. I got the idea for using ice for grinding from Frank Ford's Frets.Com website. Thanks Frank! It works great! The whole site is interesting / useful, but his shop tips are wonderful.
To conclude - even if a part isn't available, there isn't any reason you can't find (and adjust) something into a suitable replacement. A minimum number of metalworking tools you should already have (hacksaw, bench grinder, files) will get you there most of the time. Ice is wonderful for grinding & will prevent you from removing temper and/or keep you from burning yourself. A well stocked local hardware store is worth its weight in... ...broken tools that would otherwise be binned or recycled. If it is a complex part, try the manufacturer first, generally through their website.

Sunday, July 19, 2009

Ed makes a computer desk for his Mom's birthday

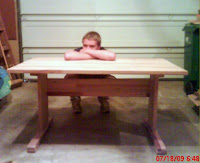
This is a computer desk that my son Edward made for his Mother's 50th birthday. A simple trestle design, and sized to fit a particular space, this was something that she had been wanting.
You can see that it is glued up from strips of wood (hardwood, mostly Oak) and fairly thick. The wood was purchased from a guy advertising "12 inch wide Oak boards." Of course I got excited and made the 45 minute drive without asking enough critical questions. Even though the product wasn't exactly what was mentally pictured when I read the Craigslist ad, I still left with the little pickup loaded with boards. These boards are tongue and groove and look like oversized pieces of flooring. They were made to be installed as flooring and rub rails for the trailers of tractor/trailer long-haul trucks (strong enough for forklifts to drive on.) They are finger-jointed, but the finger-joints are on the sides of the planks instead of the face, so not very noticeable.
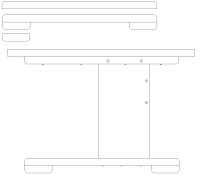
The design is pretty simple. The top is glued up of 3 pieces (after the tongue and groves were cut off as they weren't precise enough to use.) The legs and the stretcher are cut from single boards, and the feet and battens are cut from smaller pieces of the same material. All of the exposed edges were softened / mildly rounded using a random-orbit hand-sander, except for the exposed end-grain of the legs and stretchers which have a much larger radius round-over. We wanted a design that would be easy to build, move / transport and if needed, easy to store. Also, although we would have liked to use a through-tenon on each end of the stretcher, it wasn't something we wanted Ed to tackle on his first large project.
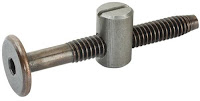
Instead, we used cross-dowel nuts to attach the modesty panel/trestle/stretcher. We got the idea from a pair of work benches brother Greg made (using regular nuts and bolts as the larger cross-dowel nut sizes are uncommon.) A little industrial but look OK & is very solid. The battens are secured to the desktop with screws and glue, with glue just on the middle of each piece: although we don't expect much cross-grain wood movement, it didn't cost us anything to allow for it.
The battens and the feet are cut to the same width, and the battens are through-bolted to the legs. We used nylon-bushing locknuts to make the connection. A good change would have been to use thicker battens to make using socket wrenches easier as the nuts and bolt heads are very close to the bottom surface of the desk. The legs are secured to the feet with long square drive screws.
The feet and the feet pads are worth commenting on. Rounding over the end-grain could have been accomplished with a router table and sled, but we took a simpler approach. We already had the monster 4" wide "hand held" Porter-Cable belt-sander out for sanding both sides of the glued up top, so we inverted it and secured it in the jaws of a Workmate, cut small 45 degree angles across the ends of all 8 pieces (two battens, 2 feet, and both ends 4 feet pads) and Ed rounded the ends over on the belt-sander. The results were fantastic! If you are just rounding the ends of a workpiece, this is a pretty good method and gives good repeatable / consistent results with no edge tear out. As observed in the illustration, it is best not to linger on the flat of the cut 45 angle, and just make the roundover in one smooth pass, repeating as necessary to complete. It took 5 slow passes to make each roundover.
Ed finished it by brushing on coats of clear semi-gloss Minwax Poly: 3 coats for the top, 2 coats for the rest of the desk. Fine grit hand-sanding and triple-aught "000" degreased steel wool to knock down nibs, bubbles, etc. between coats. Another thing that we would change if we were doing it over again would be to pre-finish (at least 1 coat) the pieces before assembly.
The desk was a success (his Mom loved it) and it was a lot of fun helping Edward get his first large project completed.
As this will primarily be used as a laptop desk, Ed's next project / present for his Mom will be to make a back-of-desk-organizer, with pigeon holes for paper and other supplies.