I'm actually writing this at the end of January, 2010, but thought I would put this entry where it belongs, in November of 2009... Sorry folks - have been busy, but will try and catch up a bit.
The Garden Arbor was a success! You would think something so simple to make would have taken less time, but I barely had it done in time for the wedding. There was a lot of prep-work (pre-painting things, and even selecting materials and paint that wouldn't look shabby too quickly) but even assembly took some time.
The treated wood that it is made from took a long time to dry - it was still damp-ish to the touch, 2 weeks after buying it. We finally brought it into the living room to bake in front of a roaring fire as time was getting short.
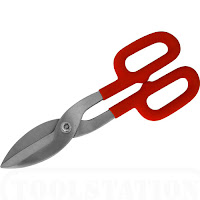
The only major change to the design was not cutting out side "windows" in the lattice - I couldn't figure out a way to cut the vinyl lattice without it shattering somewhat - actually wasted a sheet attempting to cut good windows with a variety of hand and motorized tools. After the wedding, I discovered that regular straight tin snips / shears make great cuts in the stuff - who would ha' thunk it. I think it was the only tool I didn't try beforehand. Circular Saws threw chunks, Jigsaws melted it rather than cut it, Hacksaws also melted it, Straight-cut router bits either melted it or threw chunks, depending on bit diameter...
Oh, another change was that the side flower boxes weren't used in the ceremony - built, just not used. The vine artificial flowers were used as shown and looked great though.
My ability to cut out wooden hearts was sorely tested - we ended up buying those from a local retail outlet of Craft Warehouse. The trim colors of Blue and Green for the hearts were a nice find. The local ACE mixes small sample-size containers to try a color out - and at $4 each there was plenty left over. I'm very glad I didn't have to buy a quart of each!
Treated and "Marine Grade" wood was used throughout so it should last a good many years!
Congratulations Jeremy and Natalia!
Sunday, November 15, 2009
Sunday, October 25, 2009
Ikea, Glue Blocks, Ikea Hacking and Bob Flexner
I don't like Ikea. Don't get me wrong, some of their stuff is great, but when it comes to their non-wood flat-pack furniture made out of that press/chip/particle/fiber/wafer board, I'm not a fan. Sure, it is finished really nicely, but it isn't wood. This "rant" applies to all of the ilk, not just Ikea. I've heard people have good success with things like kitchen cabinets and closets that you build in, and never move. But after a few years go by and moisture gets under the finished surface, or a corner curls, or a screw or two gets loose in a hinge... Well, you get the idea. Don't get me wrong, some of their real wood furniture items really do wear well. However, as most of their furniture is flat-packed (flat case pieces, bags of fasteners and other hardware and a couple simple tools to assemble them with) and made to be assembled without glue or clamps, the joint is usually a mechanical one - the quick / cam metal fasteners are holding the piece together. Nothing wrong with that... ...until you move it. Metal fasteners are stronger than wood and they don't give. Ikea engineers do a pretty good job of making sure that the furniture can resist the stress of normal use, but as soon as something gives a wracking force jolt, the metal hardware will do its best to keep things together, but what ends up "giving" is the MDF / chipboard - it will flake, dent and delaminate if you look at it wrong. And, as soon as a piece starts to get wiggly, it is only going to get worse.
Ok, woodworkers / cabinet makers are not the target audience of flat packed furniture. However, I'm sure I'm not the first that has been roped into assembling one, or been asked to fix after it has started going bad.
I have a couple suggestions:
First, use glue - it isn't going to help as much as if the product was wood, but it will help a lot. Some people think glue and Ikea are a bad combination, but the basic argument is that it makes it take longer to assemble, and you lose the flexibility of being able to break it down later. Well, most folk I know don't move so often that this is an issue. But, something to consider if you are putting something together for a teen or someone college-age.
Second, replace flimsy backs with plywood. A lot of Ikea backs are just for show, not to prevent wracking stress. Some of their backs are only 2mm thick, and are basically finished paper. If you want, you can glue that back to plywood, and then attach it to the case. I got this tip from my friends Don and Sue, who replaced the backs of some of their bookcases many years ago to help make them more earthquake proof / allow them to secure them to the wall.
Third, replace screws with nuts and bolts (not always possible, mostly screws are used for blind-side applications.) Screws strip out. Not all Ikea screws are the nice Spax (shown at left) or Confirmat screws that are made for MDF / particle board. But, when you can, upgrade fasteners. Sometimes the upgrade has to be gluing hinges rather than replacing fasteners. FYI, Spax screws are available at both Lowes and Home Depot & although you still need to pre-drill, you don't need to use a special drillbit like you do for Confirmat. You do have to be careful using them in plywood though.
Fourth, use Glue Blocks. The reminder I got for doing this was from Bob Flexner, in this article. Glue blocks have been used forever, why not use them to upgrade Ikea furniture stiffness? Glue blocks for Ikea furniture will do (potentially) three things - give you more surface area to glue two elements that join at 90 degree angles, provide a 90 degree square for assembly and (if needed and is possible to do in a way that won't show) allows you something to anchor screws in. Yep, when you can, pre-drill and drive drywall screws through the chip board, into the hardwood blocks you've added, for more strength.
Finally, if you are stuck with an Ikea product that is falling apart, and wasn't doing exactly what you wanted to anyway - hack it! These folk repurpose Ikea stuff for some fun results. I especially like this one.
Oh, another good tip is that Ikea does sell replacement parts - handy if a leg or bit of hardware fell off during a move. If a panel was damaged, consider replacing it with plywood - same arguments as for using glue blocks, above.
To conclude, I still like used solid wood furniture better than new Ikea. But if you have to deal with it, I hope the above tips help.
Labels:
bedroom furniture,
Bob Flexner,
chip board,
fiber board,
flat pack,
flat packed,
Glue Blocks,
Ikea,
MDF,
particle board,
wafer board,
Wracking
Saturday, October 10, 2009
"My favorite American Communists" (and their boxes)
Referring of course to The Shakers. I can't take credit for the phrase, that belongs to Roy Underhill, author of many books, host of the PBS show "The Woodwright's Shop" and now master of his own woodworking school. I wouldn't give up any important bits of anatomy, but I really would like to go to any class he teaches! (End of digression)
 I don't want to get into who the Shakers were as a people / culture, I just want to gush about their legacy of fine craftsmanship. Many of the forms I first identified (in my naivete) as being "Craftsman" or "Arts and Crafts" belong to the Shakers. They were the first to eschew ornamentation of form for the higher beauty of function and simplicity. They made many fine things and there are plenty of books out there about their works. Today I just want to talk about Shaker Boxes.
In the days before Tupperware, Shaker oval boxes and other variations on this form were some of the best lightweight ways to store things. A couple of thin, steam bent hoops sized on forms, secured to themselves as well as their flat oval lid and bottom boards with wooden pegs and copper tacks and there you are: "green" biodegradable storage that can last forever, with care.
 Pictured at the left is John Wilson with his work. He has the best website for all things related to making or buying modern Shaker Boxes. If you are interested in making these, his catalog is required reading. For one thing, I'm not sure you can buy the copper tacks anywhere else. "The copper tacks used in oval box construction are made on machines that date back to the 1800’s. Our machines were acquired from the W.W. Cross Nail Co. when they ceased tack manufacturing in 1991. We currently make nine sizes of tacks plus the ½” copper shoe peg used for securing top and bottom boards when copper is preferred in place of wood pegs." Shaker boxes range from 000 (tiny) to size 12, although I've seen pictures of larger coffee table sized boxes. Each size nests into the next larger size. Eventually I will try my hand at a stack of these.
 I don't want to get into who the Shakers were as a people / culture, I just want to gush about their legacy of fine craftsmanship. Many of the forms I first identified (in my naivete) as being "Craftsman" or "Arts and Crafts" belong to the Shakers. They were the first to eschew ornamentation of form for the higher beauty of function and simplicity. They made many fine things and there are plenty of books out there about their works. Today I just want to talk about Shaker Boxes.
In the days before Tupperware, Shaker oval boxes and other variations on this form were some of the best lightweight ways to store things. A couple of thin, steam bent hoops sized on forms, secured to themselves as well as their flat oval lid and bottom boards with wooden pegs and copper tacks and there you are: "green" biodegradable storage that can last forever, with care.
Wednesday, October 7, 2009
November Wedding Garden Arbor #2
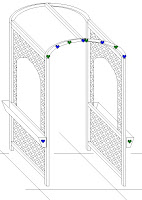 A couple of people emailed me asking what I meant by "lattice" and "flower boxes" so this post is mostly about the rough pic showing most of what I was talking about. The top will have lattice too, but attempting to draw lattice conforming to a curve in an orthographic projection using MS Paint is beyond me! Eventually I'll figure out how to do it in SketchUp, but for now, shrug.
In thinking about this design, I think if I had the skills and right tools, I would make the Arbor frame out of powder coated welded steel for durability and to give it a more "airy" feeling & to allow it to survive outdoors longer. Vinyl instead of wood lattice was selected by the couple for its durability. But, wood for the frame is warmer to the touch and more relaxed than formal & it will be beautiful. (Fingers crossed)
Oh, in this Home Depot picture you can see what I was talking about regarding wood patches to tie the top and the sides together. I'm glad we can do without those!
Labels:
Arbor,
Flower Boxes,
Garden Arbor,
Home Depot,
Lattice,
sketchup,
Vinyl Lattice,
Wedding,
Wedding Arch
Tuesday, October 6, 2009
November Wedding Garden Arbor
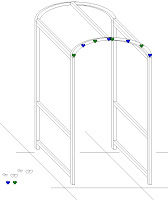
Our only local cousins oldest son Jeremy is getting married to Natalia (who is already part of the family) in just less than one month! I asked them what they would like me to make for them as a gift and instead of some piece of indoor furniture, they came up with the idea of a garden arbor - that they will be married under! How fun is that? The only picture for this post is a simple illustration of the basic frame of the arbor / arch. Five feet wide and four feet deep, it will be the perfect size to frame the lovely couple and minister, and a garden bench afterward. The design is Jeremy and Natalia's - I just had to figure out how to fit the bits together.
Details of this Arbor: The arch joins the uprights smoothly, rather than with overhangs like some. As they are getting married outdoors, the arbor will disassemble into 3 pieces (top and two sides) for easy transport. The sides and top will be composed of lattice over the frame shown, with an arch-topped "window" in each side. The middle rail on each side will support a flowerbox, also decorated with hearts. The lowest side rail is slightly above the "feet" to keep it from ground contact. The top rails abutt the bottom rails of the arch.
I was looking at different ways of joining the arch to the sides and have seen a number of relatively simple ways, from overlapping wooden joining plates to metal straps. My first inclination was to join the pieces in some hidden fashion, both for appearance and to prevent places for the ubiquitous rain and dew to catch and aid in the decay of this structure. What I came up with is shown. The rails themselves will be joined by screws from the bottom side of the top side rail into the bottom of the bottom rails of the arch, so no wooden patch plates or Simpson Strong-ties will be needed. So a nice smooth appearance.
The fasteners are stainless steel, the lattice is vinyl and the wooden frame is treated cedar 2x2s, painted white. Exterior construction caulk to keep rain out of places it shouldn't be. The side flower boxes are cedar. Construction begins this upcoming Saturday.
Labels:
Garden Arbor,
Hearts,
Wedding,
Wedding Arch
Wednesday, September 30, 2009
安揉 Anjuu - Rich Soborowicz's furniture
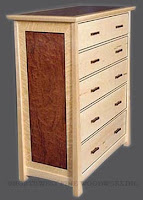 In Seattle Washington, there is an outfit called NW Fine Woodworking that makes some pretty amazing stuff. This post started off as just a "gush" about how much I liked the looks of one of their studio furniture maker's works: Rich Soborowicz's, some of which he calls "Anjuu". Pictured is the Anjuu Chest of Drawers from their website, from a full line of bedroom furniture that he makes.. Made of maple, birdseye maple, rosewood and bubinga - I think it is pretty. Of course, given that a lot of his work has a Japanese flavor, I *had* to find out what Anjuu meant. The most popular English translation is "living peaceably" The two characters, An and Juu are interesting too.
An (安) is composed of two parts, onna (女) which means woman/female and ben (宀) which means shaped crown. So the kanji of a woman wearing a crown (An) means: relax, quiet, rested, contented, peaceful.
Juu (揉) has 4 different components (one of which (木) means tree) but the composite character (Juu) means: rub, massage, shampoo, debate vigorously, train, coach, worry.
So, a well cared for woman, treated royally means "living peaceably". I rather like that. Puts me in mind of the phrase "She Who Must Be Obeyed" (SWMBO) which is often used online to refer to one's spouse.
The best way to achieve the state of "living peaceably" might be to get your SWMBO a bedroom set made by Rich! Hehehe
Ok, a huge digression, but not one that distracts too much from my main point (I hope) which is: if you live anywhere near Seattle, you owe it to yourself to take a look at their gallary of fine work. Tomorrow begins their "Maker's Mark" events, the best part of which is that the artists / artisians will be available for Q & A every Saturday and Sunday in October, from Noon to 3pm.
Monday, September 28, 2009
Replacing tool power cords
"Tailed assistants" if they are helping you, "tailed devils" if they are part of the problem. I was all prepared to do a step-by-step power cord replacement post, but found one on the Fine Homebuilding website that did it better than I would have. Read this great article by John Ross on replacing circular saw cords and triggers. It is from the original Fine Homebuilding Magazine article in 2007, but it is timeless & well worth reading. Reading it did bring up a few ideas that are topical though - you do have some options when replacing power cords. It is true that for safety you want the outer sheathing to be unnicked and unpatched, but there is a great difference in opinion on how long a power cord should be.
If you cut through your cord, you could simply add a new plug to the existing cord at the break, without the need for disassembling the tool itself - assuming that you can live with a shorter power cord. If this is the direction you want to go, there are a great variety of tool plugs that you can get.
A lot of contractors like short cords with twist-lock plugs - especially for roof framing where losing connection between a framing saw and the extension cord can not only mean time lost, but can be a hazard to anyone below. Personally, I favor the standard "Edison" standard wall-plug connectors that most tools come with by default, as rewiring or using adaptors can be an expensive proposition and I'm not on a roof with a saw all that often.
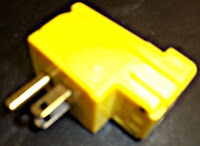 But, having a cord pull out is a pain and my favorite solution is a right-angle replacement plug which fixes the problem nicely. It provides just enough friction that accidental disconnects don't happen very often, if ever.
Another alternative to buying a replacement cord is to go the other way - use the piece of severed cord with molded plug attached (or whatever clean length of cord there is between the plug and the break or abrasion) and replace the "stub" as in the above Fine Homebuilding article. You may have to put your own connectors on it, or use a soldering iron to tin the leads, but it is a darn sight cheaper than buying a new cord from the manufacturer. Actually, I've only bought a new replacement power cable once - and that was because the strain relief was ruined, and the new cord came with one specific to the tool which was molded on to the cord rather than a separate part. Even if you aren't busily ruining power cords yourself, the most common defect you run into when buying a used power tool is a bad cord - generally repaired with miles of black electrical tape! Getting comfortable making this type of repair will keep you a good deal safer and good tools out of metal recycling bins.
If you cut through your cord, you could simply add a new plug to the existing cord at the break, without the need for disassembling the tool itself - assuming that you can live with a shorter power cord. If this is the direction you want to go, there are a great variety of tool plugs that you can get.
A lot of contractors like short cords with twist-lock plugs - especially for roof framing where losing connection between a framing saw and the extension cord can not only mean time lost, but can be a hazard to anyone below. Personally, I favor the standard "Edison" standard wall-plug connectors that most tools come with by default, as rewiring or using adaptors can be an expensive proposition and I'm not on a roof with a saw all that often.
 But, having a cord pull out is a pain and my favorite solution is a right-angle replacement plug which fixes the problem nicely. It provides just enough friction that accidental disconnects don't happen very often, if ever.
Another alternative to buying a replacement cord is to go the other way - use the piece of severed cord with molded plug attached (or whatever clean length of cord there is between the plug and the break or abrasion) and replace the "stub" as in the above Fine Homebuilding article. You may have to put your own connectors on it, or use a soldering iron to tin the leads, but it is a darn sight cheaper than buying a new cord from the manufacturer. Actually, I've only bought a new replacement power cable once - and that was because the strain relief was ruined, and the new cord came with one specific to the tool which was molded on to the cord rather than a separate part. Even if you aren't busily ruining power cords yourself, the most common defect you run into when buying a used power tool is a bad cord - generally repaired with miles of black electrical tape! Getting comfortable making this type of repair will keep you a good deal safer and good tools out of metal recycling bins.
Saturday, September 19, 2009
The camera as a shop tool
Everyone has used a camera to visual document what is happening at a particular moment in time, even if it is just snaps of family and friends.
 What I want to talk about is how many different ways there are of using a camera in the shop, or for woodworking related activities & how digital cameras and camera phones have changed the way we can use pictures. Old school was taking a picture, getting the film developed and pictures printed & then seeing what you have - with some chance of repeatable results through reprinting using the negatives / enlarging and printing details of a snapped photo. Polaroid technology gave us instant results - and the only chance at repeatabilty was from viewing the resulting picture and re-taking a better shot.
 Digital camera technology, whether in a discrete camera, a cellphone camera, or even in a device family that started out as a music player and continues to add features has the best of all worlds - an instant look at the image you've captured and the ability to edit an image in endless ways after the fact before you print it - if you ever do. Frankly I rarely print pictures anymore.
 Regardless of the history lesson, for most people, film cameras of any sort are dead, so I will be focusing on the use of a digital camera / camera phone for woodworking purposes. Sure, there are still plenty of people getting film developed, but when a serviceable point and shoot 5mp camera costs less than developing and printing costs of 6 rolls of film I have a hard time understanding why. Shrug. Dismounts soapbox.
Most of these tips are of course usable for more than just woodworking, but if I didn't limit the focus of this blog, it would be pretty random!
- First, there is the act of recording your work - even if it is just for yourself, a good photographic record will keep things crystal clear, long after your memory has faded. Howard Ruttan said it best, here and has plenty of good "how to" tips, too.
- Take pictures of products / product barcodes instead of hand written notes when going to the store to buy more - I've found this especially helpful when buying cans of finish, where you need to buy more of exactly the same stuff, but don't want to drag the entire can with you - I use the camera on my cellphone for this and don't bother printing - I just view the image on screen. Can price shop this way too - take a picture of the product barcode and price tag, and use the info to shop for a better deal after you leave the store.
- Take pictures of furniture / ideas that you really like that inspires you. I've done this with fellow craftsman's work (with their permission) and at furniture stores (well, I've never been asked to stop.) When I see something I really like or want to duplicate or make my own version of, I take a quick snap. I keep a folder of images on my computer full of pretty furniture - and details of furniture I particularly like.
- Decide on finish - depending on what image editing / manipulation software you use, you can take a picture of an unfinished piece and can play with color digitally before committing yourself.
- Use a cropped digital image in a Google Sketchup drawing to see if it is what you / you client wants - as long as the angle you take the photo at is appropriate to the view you eventually want to look at, Sketchup is quite accomodating - simply align the drawing to the image. You can do it the other way too - take a picture of the wall a built-in or any other piece is going to be against, and position your Sketchup model against it. Get the sizing just right, then use relative measurements to perfectly size the piece you are making.
- Tool repair - any sort of complicated dis-assembly can benefit from pictures along the way to aid in re-assembly. Actually, this tip is what caused me to write this entire post - was about to strip laces out of a pair of shoes preparatory to tossing them in the washer & out of habit took a picture of the way they were laced, so I could re-lace exactly the same way.
- Using a camera as a magnifying glass - when working on something tiny, a camera that has a good zoom feature that works well in low light situations can help you without even needing to take a picture - just use it as a really expensive combination lamp and magnifying glass, or snap a picture with flash to see around corners / into dark, awkward or tight spaces.
- Take pictures at auction previews, estate and garage sales - or any other buying situation, including wood purchases. This is where a cellphone camera shines - especially if you see something someone else can use - email or message the picture and get an answer back immediately rather than attempting to describe.
Well, that about wraps it up - oh, one final tip - as soon as humanly possible, give your image a meaningful file name. DSC00190.jpg doesn't convey any useful information. If you like keeping the sequence number, why not rename it to:
"DSC00190 Stickley Recliner Final Dry Fit view from front.jpg" ?
Yep, nothing wrong with spaces in filenames, and it makes searching for the image you want much easier. If you manipulate images a lot, consider adding suffixes such as the date, and if you've resized it from the original, note that too. So your final filename for a version you plan to post on the web or send in an email might be:
"Stickley Recliner Final Dry Fit view from front 2009 September 19 800x600.jpg"
Yep, I leave the sequence number off, and simply use the sort order to group pictures in the same series, or I add my own sequence number:
"Stickley Recliner 001 Grain selection for parts 2009 September 07.jpg"
...so that even if I want basically the same filename for the next 5 shots, the rest of the pictures in the sequence (002, 003, etc.) are still unique. I leave date at end so that even if a particular group of pictures span a few days, they will still be grouped together. But really, what ever works for you is perfect.
畫意能達萬言
A Picture's Meaning Can Express Ten Thousand Words.
Labels:
Camera,
cellphone,
digital camera,
ipod nano,
polaroid,
sketchup,
tool repair
Monday, September 14, 2009
Shop space / Man cave
The house pictured is my favorite local "Bat Cave." Southern facing, ability to open up the doors and take in the sunshine - perfect! There are a few other houses that are similar in the area, but this one is my current favorite. A 5 car garage with a house over it would be ideal for my needs. Ok, why did I call it a Bat Cave? Phrase came from bro Greg, regarding some of the house designs I've come up with over the years: "Sure, it is cool, but it is like Batman's Batcave - guys all dig it, but you could never get a woman to live there with you."
You have to admit, he has a point. My current "shop" is garage based, with work spilling into the driveway whenever the sun makes an appearance. Most hobbyist woodworkers are in the same situation - whether their shop is in a basement or garage, there just isn't enough space. There are some interesting alternatives out there though. First, you can build a detached shop, separate from your home. Second, you could rent space for a shop. Third, you could learn to make do with the space you have available.
And finally, you could share a shop with someone, either formally, or informally. If I lived closer, The Shop People in Portland at SE Grand and Oak have an amazing shared setup. Plenty of quality tools, and you simply pay a low monthly membership fee. Somewhat closer to home and with a diverse tool selection is Portland TechShop which also offers classes in using some of the more high-tech tools. Classes taken in more traditional venues are another option - most community colleges have woodworking classes, and there are woodworking specific schools nearly everywhere too. The NW Woodworking School founded by Gary Rogowski and the Oregon College of Art & Craft are probably the two most famous locally. But, schools don't really solve the shop space problem. So, no answers for the masses, just a review of options
Friday, September 11, 2009
Branding / Leaving your mark
Rockler and many other companies offer woodburning brands that you can customize - some with your name, some that are just a logo, even just initials. I've seen them offered with and without their own heat, so some are truly like a branding iron, while most are like large electric soldering irons. They even offer a date attachment that you can change (buy a new one) each year - but it is so expensive you may as well buy a whole new brand. Well, some of the graphic brands are more expensive, shrug, may be worth it for those.
Some use the right size forstner bit and drill a shallow recess and epoxy in a coin with the current year. I like this because it gives a solid date that can survive refinishing if need. Whenever you embed a coin though, you wonder if some 10 yo is going to dig it out eventually - either for his collection, or to put in a gumball machine.
Decals and stickers are another option and have been used by professionals and amateurs for many years as well - you can now make your own decals easily using a desktop inkjet printer.
I "Branded" this Blog by making a "Leach" icon that is simply a large "L" cradling the letters e,a,c,h. which arose from my interest in creating a furniture brand. If I was going to use this as a basis for a decal, the "L" would be a try-square. The top two brands pictured are real cattle brands from our family history / background in farming and ranching. The first is Bar Lazy L ( (the horizontal top line over an L over a rocker) which was our Paternal Grandfather's brand. The second brand was our Maternal Grandfather's initials, with the first initial reversed for balance, probably the same as his monogram.
Anywho, no decisions yet on a brand for me. We've done a few "branded" projects - one by putting a hand written piece of paper into a hollow spot in the project (I like that, and will do it again) before sealing it closed and another by signing in ball-point pen (although a laundry marker would have been much better) and finishing over that.
Labels:
Brand,
Branding,
Coin sized forstner bit,
Decal,
Family,
Maker's Mark,
Rockler,
Stickley,
Water transfer Decal
Sunday, August 30, 2009
What Is It... ...revealed!
 The pictures tell the story. The "tool" is a kitchen tool - but then almost everything used to come in a sealed can. Heck, I think somewhere in my tools I still have a piercing spout for motor oil.
So, it makes sense that he / his father would have a can opener in with his other woodworking / home maintenance / construction equipment. I have a "church key" combination bottle / can opener in my tool box that future generations may puzzle over.
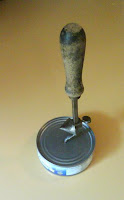 It does work amazingly well. Jab the center of the lid, adjust the cutter to the edge of the can, plunge it, grip can with one hand, turn can opener around until you either free the lid, or leave the lid attached and pull free with the point of the opener.
I think the downside of the tool is having to grip the can while using it - which is why the crank style can opener won out. It is at its worst with a small can like the pictured can of tuna. Simply less can to grip.
Here we have jabbed as accurately as possible.
 Next, we engage the cutter, which has been moved and tightened for this size can.
 Here we have pulled the cutter most of the way around the can. (This part is pretty quick, although we haven't tried a can race between electric, hand crank and this old fellow yet.)
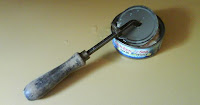 And a last picture with the lid nearly removed and hinged up from the can.
Labels:
can opener,
game,
old tool,
What is it?
Sunday, August 23, 2009
What is it?
 I picked up this tool at a garage sale yesterday for a couple of bucks. The old gentleman that was having the sale was in his 70s or 80s and had a number of tools that were his father's - including a handsaw with a nib that just wasn't in good enough shape to turn back into a user, but was most likely over 100 years old. The pictures are of a tool that he couldn't identify, but that my eyes passed over until someone else asked him what it was. I had a guess at it & snagged it, just because it was a fun artifact. Other than lightly cleaning it I didn't do anything else to it. My teenage son used it successfully and quickly the very first time - the tool functions like new!
 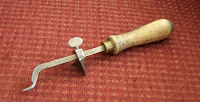 Of course I had to try it & was amazed that it works better than modern replacements. As you can see, it has a point on the end, and an adjustable double-sided cutter that is set with a thumbscrew. The thumbscrew locks the cutter to the shaft of the tool. The cutter isn't particularly sharp, and is an arc, coming to a single point. Frankly, I don't think the cutter was any sharper when it was brand new. I showed my parents thinking that there was a chance that they wouldn't be able to identify & my Mom said that her Grandmother had one that she used all the time. She also said that they fell out of favor after the war (WW2) and that she hadn't seen any since then.
 So, my question to you is: what is it? Instead of giving the answer away, I thought I'd give you a puzzler. If you know the answer, please don't post as a comment. email me with your guess and I'll send you a picture of it in use, or give you a hint if you are wrong - or heck, will just send you a pic / tell you if that is what you would prefer. Hope this is fun for you!
Labels:
email me,
game,
old tool,
What is it?
Saturday, August 22, 2009
Fein MultiMaster
This is the model with case I bought, but I didn't pay $399 for it! I bought it at (of course) a garage sale for $25. Yep, pretty good deal, right? Hold on a second - check out how expensive the BLADES for it are! Yeah, a major stumbling block for me. Fortunately, there are a few options. I'm sure some of the competition's blades and accessories will fit & I can always make my own. Yep, there are some brave souls out there that have made their own blades for this tool, which may make it more affordable for me to own and use. I know we sure could have used it on a recent bathroom remodel.
Dana Decker's method is pretty much the standard way folk are going about it. This guy does much the same thing, but without having to melt the mounting hole. I'll probably end up trying both at some point as I really can't see shelling out more for blades than the tool cost me initially.
There are a few folk that sell somewhat cheaper blades - Multiblades and Imperial Blades appear to be the most popular. But if you need a Bimetallic Metal Cutting Blade you'll have to buy Fein's, as no-one else makes them.
I guess this post is mostly a tool gloat, but I hope someone else out there stumbles across this post and is able to save themselves some money keeping their Fein MultiMaster on the job.
Labels:
accessories,
Amazon.com,
Fein,
Fein MultiMaster,
MultiMaster,
replacement blades
Friday, August 21, 2009
Saving Woodworking Articles for later viewing, Part 1
The web is great - I'm sure we've all found a lot of information that we can't live without, surfing around. Sometimes you will find a really useful article that you don't want to lose track of, and are a little afraid about finding it on the 'net again. Sure, you could print it, but the images lose their crispness and much of the detail.
Internet Explorer can help you out. You can save entire webpages for offline viewing, here is how:
When you use viewing any webpage, go to the File menu and use the Save As... option - choose a desination and name, but select the "Web Archive, single file(*.mht) as the Save as type: - this will create a file with all the pictures that can be viewed offline, backed up to CD and stored, whatever. There are other methods for saving webpages, but only this one puts everything into one file. I think you are fine about doing this for your own use, but I'm not sure about the legalities about sharing .mht files with others. Remember, this only works with Internet Explorer. Whoops! I'm wrong! There is support for MHT / MIME HTML files in other browsers. I wish I had known about this feature a few years ago - I stumbled across a guy that made a pair of Stickley style recliners out of flame figured Maple, with good pictures of each step of the process... ...and could never find the page again.
Monday, August 17, 2009
Shelf life and product code dating
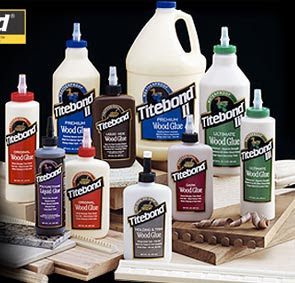 Titebond in all the different flavors is my favorite family of wood glues. Franklin gives a standard shelf life of 1 year for all their glues for an unopened container. Keeping air out of the container helps, but still begs the question: When does that timer start? When was that bottle of glue made / when does that year start? That question is equally applicable to any finishing product.
It basically comes down to lot numbers. Lot numbers are generally stamped in easily smudged numbers on individual bottles, but if not there, then is printed on the cardboard box the bottles come in - thank goodness many stores only unbox a few bottles at a time and the rest stays easy to date from their birth certificate on the box. Quoted from www.titebond.com:
"How do I read the lot numbers?
The letter "A" is always used at the beginning of a Franklin International lot number. The second digit corresponds to the last number of the year. Digits 3 & 4 correspond to the months of the year. The 5th and 6th digits correspond to the day of the month the product was made. Lastly, digits 7 through 10 are batch numbers. Therefore, a Titebond product with the lot number of A906010045 was manufactured on June 1, 2009."
It turns out that there are more ways of coding Titebond Lot numbers than the above, as talked about here.
So, it comes down to tracking down (and deciphering) what the lot numbers mean to determine product age - marking a products "born on" date isn't as useful as marking when it goes bad, which I recommend that you do "in the clear" with a Black indelible marker! Especially if you have to get the "born on" date from a box that stays in the store. If you can't be bothered, buy from some place that does brisk business and date from when you buy the bottle. Otherwise, beware of that dusty bottle purchased from a Mom and Pop - sorry, I like to support Mom and Pop operations, but your project depends on its life based on the glues and finishes it is made with.
Labels:
age,
finish,
Lot Numbers,
Shelf Life,
Titebond
Thursday, August 13, 2009
MSDS - why you need them.
 A MSDS (Material Safety Data Sheet) is a form produced by the manufacturers of all most all chemicals. Large businesses are required to have the MSDS information at hand for any of the products they use in their daily work. So why do you need them for the products you use? Well, mostly you don't, but I can give some compelling reasons to seek them out.
1) MSDS list the ingredients of the product you are using. Yep, ever wonder what was in some of the finishes you use? An MSDS will tell you, down to the percent. Poor labelling of consumer packaging no longer has to stop you from knowing exactly what you are exposing yourself to, or for that matter whipping up some of your own if that is cheaper for you. Many manufacturers rely on the "Secret" of what is in their stuff to stay in business.
2) The real purpose of MSDS sheets; safety - it is always good to know what you are being exposed to. Everything from alergic reactions, wondering how to store safely, or is it safe to mix with another product, etc.
Here are a few to get you started.
Rockler provides MSDS for the chemicals they sell and even have a nice search engine. As they sell the Sam Maloof finishes, kinda interesting reading!
Highland Hardware also has a list of MSDS for what they sell.
Rockler provides MSDS for the chemicals they sell and even have a nice search engine. As they sell the Sam Maloof finishes, kinda interesting reading!
Highland Hardware also has a list of MSDS for what they sell.
MSDS online is a pay service, but allow trial use, so if you have one in particular that you are interested in looking up, this may be your best option.
Oh, and I've noted that even if a .COM company doesn't have MSDS sheets online for the public, sometimes the Canadian version of the same company / site will.
Another tip - sometimes you can get the information you need simply by asking for it, either by mail, phonecall or webform. "I need the MSDS information for product X, please." Will generally get the job done. I like the "Contact Us" webforms that most companies provide for their sites.
This may be another good way to track down info.
So if your interest is simply casual (What is in this stuff? / Can I make my own version more cheaply?) or because you have concerns (Last time I used this stuff, I got a rash.) the right MSDS is where you need to go for the answers.
Labels:
finish,
MSDS,
Rockler,
Sam Maloof
Saturday, July 25, 2009
Tool repair: Hacksaws, Bench Grinders and ACE Hardware
As a known estate and garage sale habitué, it shouldn't surprise anyone that more than half of my tools are less than new & are sometimes purchased in need of love.
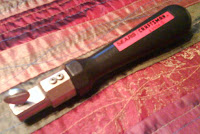 Today (out of a box of tools labelled "50 sents each") I got a reciprocating saw-blade holder. Really, just a handle that would let you use Sawzall blades as a small handsaw. This one was made by Craftsman, and except for the missing thumbscrew to secure the blade is in great shape. Of course I tried to track it down, but it either came as an included accessory of a reciprocating saw, or wasn't deemed worthy of maintaining parts for (the plate that grips the blade is trapped / non-removable, so the only replacement part *IS* the thumbscrew.) No matter, my local ACE hardware has a ton of bolts and thumbscrews, so an easy fix.
 Today (out of a box of tools labelled "50 sents each") I got a reciprocating saw-blade holder. Really, just a handle that would let you use Sawzall blades as a small handsaw. This one was made by Craftsman, and except for the missing thumbscrew to secure the blade is in great shape. Of course I tried to track it down, but it either came as an included accessory of a reciprocating saw, or wasn't deemed worthy of maintaining parts for (the plate that grips the blade is trapped / non-removable, so the only replacement part *IS* the thumbscrew.) No matter, my local ACE hardware has a ton of bolts and thumbscrews, so an easy fix.
Took the handle to the store and using the bins of bolts determined that it was 1/4", 20 tpi (threads per inch.) Second step was to decide what sort of head I wanted - wing nut, thumbscrew, slotted, hex drive with round knurled side - lots of options. Having no idea what the original looked like (although I'm guessing low-profile knurled edge, coin-slot to tighten so as not to get in the way) I decided on a thumbscrew. I may have gone with something with a lower-profile head, but this handle can be used to grip the blade either way - straight up, or flipped 180 degrees, so if a thumbscrew would get in the way one way, I could simply remove and flip the blade and retighten and be back in business.
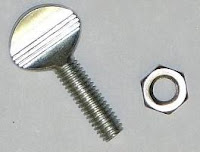 ACE "only" had 2 lengths in the thread size that I needed - too long, and even longer. I really only need 3/8" of threaded length and leaving it long would have gotten in the way even worse. So, in addition to the thumbscrew, I also bought a stainless steel nut of the right size, and a couple washers. Sure, I probably have those, but rather than finding them in the garage, it was easy to spend the extra 20 cents to save time. After I got home, I slipped the washers onto the thumbscrew and tightened down the nut - the threads under the washers and nut were about the length that I wanted. If I wanted to leave any longer length of threads, I would have bought 2 nuts and not bothered with the washers and simply tightened the nuts against each other. I then used a hacksaw (although using my reciprocating saw would have had a certain poetry to it) to cut off the extra threads. The next part could be accomplished with a hand file, but I wanted this tool to cost less than buying one new (time is money) so I used a bench grinder to smooth the end of the threads up to the stainless steel nut. Depending on how good your hacksaw job is, this can be pretty painless & accomplished quickly without the need for quenching.
 ACE "only" had 2 lengths in the thread size that I needed - too long, and even longer. I really only need 3/8" of threaded length and leaving it long would have gotten in the way even worse. So, in addition to the thumbscrew, I also bought a stainless steel nut of the right size, and a couple washers. Sure, I probably have those, but rather than finding them in the garage, it was easy to spend the extra 20 cents to save time. After I got home, I slipped the washers onto the thumbscrew and tightened down the nut - the threads under the washers and nut were about the length that I wanted. If I wanted to leave any longer length of threads, I would have bought 2 nuts and not bothered with the washers and simply tightened the nuts against each other. I then used a hacksaw (although using my reciprocating saw would have had a certain poetry to it) to cut off the extra threads. The next part could be accomplished with a hand file, but I wanted this tool to cost less than buying one new (time is money) so I used a bench grinder to smooth the end of the threads up to the stainless steel nut. Depending on how good your hacksaw job is, this can be pretty painless & accomplished quickly without the need for quenching.
I then removed the nut and washers, and did a trial fit. Note - one of the main reasons for putting the nut(s) on is so that you can keep the threads clean / relatively burr free. Simply removing the nut slowly can clean up / chase the threads a bit for you. That is why I spent the extra couple of cents on the stainless steel nut - as it was a bit harder than the thumbscrew, it was adjusting it, rather than the thumbscrew adjusting the nut. If there was room for 2 nuts, I wouldn't have bothered with stainless steel. Trial fit - a bit long. Replaced the nut without the washers and got a cube of ice from the kitchen. Too short to make an adjustment cut with a hacksaw, I would have to grind off about the thickness of a washer. Tightly trapping the "thumb" part of the screw between my thumb and cradled ice cube, I ground off what I needed, rounding a bit this time to allow easier insertion. I got the idea for using ice for grinding from Frank Ford's Frets.Com website. Thanks Frank! It works great! The whole site is interesting / useful, but his shop tips are wonderful.
To conclude - even if a part isn't available, there isn't any reason you can't find (and adjust) something into a suitable replacement. A minimum number of metalworking tools you should already have (hacksaw, bench grinder, files) will get you there most of the time. Ice is wonderful for grinding & will prevent you from removing temper and/or keep you from burning yourself. A well stocked local hardware store is worth its weight in... ...broken tools that would otherwise be binned or recycled. If it is a complex part, try the manufacturer first, generally through their website.
Sunday, July 19, 2009
Ed makes a computer desk for his Mom's birthday
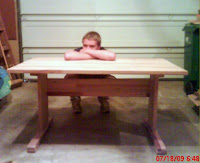 This is a computer desk that my son Edward made for his Mother's 50th birthday. A simple trestle design, and sized to fit a particular space, this was something that she had been wanting.
You can see that it is glued up from strips of wood (hardwood, mostly Oak) and fairly thick. The wood was purchased from a guy advertising "12 inch wide Oak boards." Of course I got excited and made the 45 minute drive without asking enough critical questions. Even though the product wasn't exactly what was mentally pictured when I read the Craigslist ad, I still left with the little pickup loaded with boards. These boards are tongue and groove and look like oversized pieces of flooring. They were made to be installed as flooring and rub rails for the trailers of tractor/trailer long-haul trucks (strong enough for forklifts to drive on.) They are finger-jointed, but the finger-joints are on the sides of the planks instead of the face, so not very noticeable.
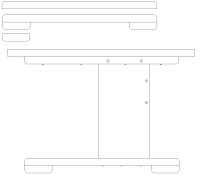 The design is pretty simple. The top is glued up of 3 pieces (after the tongue and groves were cut off as they weren't precise enough to use.) The legs and the stretcher are cut from single boards, and the feet and battens are cut from smaller pieces of the same material. All of the exposed edges were softened / mildly rounded using a random-orbit hand-sander, except for the exposed end-grain of the legs and stretchers which have a much larger radius round-over. We wanted a design that would be easy to build, move / transport and if needed, easy to store. Also, although we would have liked to use a through-tenon on each end of the stretcher, it wasn't something we wanted Ed to tackle on his first large project.
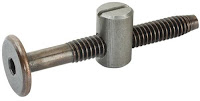
Instead, we used cross-dowel nuts to attach the modesty panel/trestle/stretcher. We got the idea from a pair of work benches brother Greg made (using regular nuts and bolts as the larger cross-dowel nut sizes are uncommon.) A little industrial but look OK & is very solid. The battens are secured to the desktop with screws and glue, with glue just on the middle of each piece: although we don't expect much cross-grain wood movement, it didn't cost us anything to allow for it.
The battens and the feet are cut to the same width, and the battens are through-bolted to the legs. We used nylon-bushing locknuts to make the connection. A good change would have been to use thicker battens to make using socket wrenches easier as the nuts and bolt heads are very close to the bottom surface of the desk. The legs are secured to the feet with long square drive screws.
Ed finished it by brushing on coats of clear semi-gloss Minwax Poly: 3 coats for the top, 2 coats for the rest of the desk. Fine grit hand-sanding and triple-aught "000" degreased steel wool to knock down nibs, bubbles, etc. between coats. Another thing that we would change if we were doing it over again would be to pre-finish (at least 1 coat) the pieces before assembly.
The desk was a success (his Mom loved it) and it was a lot of fun helping Edward get his first large project completed.
As this will primarily be used as a laptop desk, Ed's next project / present for his Mom will be to make a back-of-desk-organizer, with pigeon holes for paper and other supplies.
Labels:
Belt Sander,
Beltsander,
birthday,
computer desk,
cross dowel,
Ed,
Edward,
hardwood,
laptop,
Oak,
organizer,
Rockler
Wednesday, June 17, 2009
Woodworker Haiku

Some are from phrases I heard other places and just Haiku-ified; others from personal experience. More about the above character here.
When you are in doubt
There is no doubt to it
Go the safer route.
Sharp teeth eat the meat
Woodworking tools have teeth
I am made of meat.
Blood sweat and teardrops
All are inappropriate
in a fine finish
Stacks of wood I have
Plenty of tools I have too
No confidence though
Still have 10 fingers
But upon them I see clues:
safety should come first
Irregular no,
Custom hand made wood art, yes
Sometimes you need "spin"
Wednesday, May 27, 2009
Reproduction Stickley hardware
 One project that I've been stalled on for a while (for a variety of reasons) is now hinging (snork) on finding suitable hardware. Actually, I've found good hinges, but the pulls are what really show / what people will be handling. As it will be in quarter-sawn Oregon White Oak with only simple detailing it seemed only appropriate to use Craftsman/Stickley-style hand-hammered copper hardware at least for the pulls. Rockler offers a line of hardware made by Stickley in cast copper - perfect, right? Well, maybe. Note that I said "cast" rather than "hand-hammered" - take a look at this close up of one of the pulls Rockler offers. I've only seen a few good Stickley pieces with this sort of pull, and they did not have the same feel as the one pictured above. But, "Patterned from the original designs of Gustav and Leopold Stickley, this cast copper hardware has been re-issued by the Stickley Furniture Company exclusively for Rockler!" means that commercially, these are about as close to the best match available, right?
I did check on a couple antique sites and found one that had a pair of real 1905 - 1912 Stickley pulls for $265. Ouch. This Popular Woodworking Blog entry has a few pictures of what original hardware looks like. Yep, not cast - made from coppersmithing / peening together pieces of copper sheet and cast or thick wire for the actual pulls.
This great blog entry by Mark A. DeCou on Lumberjocks shows a way I might get what I want, but not without learning some new tricks & buying some copper stock. There are commercial ways of getting a good patination on new copper work, I'd have to use one of those methods as bright copper isn't what I would be after. I think a trip to the bookstore may be in order, and perhaps a trip to a library as well. I can make or buy nice oak craftsman pyramid knobs for the pulls, but just not what I'm after. Any suggestions appreciated!
Tuesday, May 19, 2009
The measure of things

I started piano lessons when I was in the 2nd grade... ...but what does that have to do with woodworking? It was the first time I can recall that I was interested in the reach of my hand, tip of pinkie to end of thumb. The piano keys made a simple ruler for measuring hand size. After I got my full growth as a teen, my reach ended up at just a smidgen over 9 inches. Funny, I got this image from a Girl Scout site - the PDF is actually pretty useful, and exactly what I wanted to write about today.
It often happens that I need a rough measurement and don't have a rule in my pocket, or a tape measure at my belt. I often use my hand to get a rough measurement, often walking my hand along 9 inches at a time to measure something up to around 45 inches or so. But, hands come in all different sizes. Finding the reach of your hand, finding a 1 inch knuckle joint, walking heel to toe to pace off the dimensions of rooms based on the length of your shod foot - all great, all handy. But what if you need a more precise measurement, or one you can have someone at the other end of the phone use? What common objects are handy (snork) for everyday measurement?
 For starters, paper money is good as almost everyone has a dollar near to hand. A piece of US paper currency is 6.14 inches long - close enough to 6 inches for most purposes. Folded in half it is 3 inches, in quarters it is an inch and a half. It is also 2.61 inches tall, but I never remember that.
 Coins are pretty good too. A US quarter is 0.955 inches across, and 0.069 inches thick. Not so useful if you have a good eye for such things, or are already trained to instinctively use a finger joint to measure an inch, but really handy when relaying size information remotely. A dime is 0.7 inches across and 0.053 inches thick, but I don't find that as generally useful as remembering the size of a quarter and a dollar bill. (added Sept 29, 09) I recently read that I neglected the cent! A Penny is 3/4 of an inch across - well worth noting.
 The last one pictured is simply the reach of your outstretched arms. Pictured is Leonardo da Vinci's "Vitruvian man" which was named after Vitruvius who was a Roman writer in the 1st century BC who set down ratios for human proportions. Bet you always wanted to know that, huh? (grin) So, however tall you are, that is generally the reach of your outstretched hands. The other measurements I like to be aware of is typical (Ok, favorite) chair seat, desk/ table, and kitchen counter heights - I measure those against my body. Perhaps not as handy as the above, but very handy when shopping for furniture. I really can't talk any more about it now, as it leads more deeply into the Golden Proportion / Golden Ratio!
Labels:
1.618,
Dollar,
Girl Scouts,
Golden Proportion,
Golden Ratio,
Hand span,
Leonardo da Vinci,
measuring,
Quarter,
rule,
ruler,
tape measure,
Vitruvian man,
Vitruvius
Friday, May 15, 2009
Howard Feed-N-Wax
 I've been catching up on the backlog of projects I have for friends and family lately. One project was a few single-shelf bookshelves. The first one I made was out of English Walnut and I finished with Howard Feed-N-Wax - the easiest finish / non-finish possible. Apply it, wait for 20 minutes, wipe/buff off the excess. The reason I say non-finish is that although you can apply it directly to bare wood as I did, many people recommend that you use it over a another finishing product. If there is any chance the project you are finishing is going to get wet, this is probably not the right choice! Also, you'll have to re-apply occasionally to keep the appearance up. Like all waxes, eventually it will volatilize and end up in the air - it does not just soak into the wood, it evaporates. But, if you are looking for a finish that will show off the wood and doesn't form an obscuring film, this non-finish is better than no finish & really enhances the appearance of hardwoods with smaller pores. I'm not sure I would use Feed-N-Wax directly on Oak, or on softwood, but I think it is worth your time to try it. Howard does have a product called Restor-A-Finish that they recommend that you apply to Oak first, but I haven't tried it.
I first heard about using Feed-N-Wax as a finish a couple of years ago on this page in an article called How I Clean Wooden Tools... by Ray Drake that gives a great step-by-step approach to cleaning wooden tools / tool handles. For cleaning wood, that is the simplest / most foolproof method I've seen.
Tuesday, May 5, 2009
How to Finish Wood AKA reading Bob Flexner
 I sat down to write an entry about a book I have really been enjoying the past couple of weeks. Understanding Wood Finishing: How to Select and Apply the Right Finish by Bob Flexner is easily the best book on the process of putting nearly Any finish on wood that I've ever read.
The funny part is that there were a few times that I caught myself thinking "I knew that." So I decided to look back and see where I learned that something originally. Often enough, it was an magazine article by Bob Flexner! So, I changed the focus of what I was going to write about.
First of all, buy the book. It dispels a lot of the myths and disinformation that is out there. Since applying an organic or inorganic finish is still chemistry, Mr. Flexner takes that approach to explaining the important bits. Plus, it is intensively visually oriented with more pictures and illustrations then there are pages in the book; which makes sense in a book about finish and finishing techniques. I like the sidebars, which include finish recipes, tips, and myth vs fact entries. Also, with individual chapters devoted to each type of finish, it is easy to find what you are looking for. However, without parroting or paraphrasing from the book (or pointing out that you can use Amazon's Look Inside feature to actually read portions of the book) I thought I'd list a couple of Bob's articles that are available online.
A Primer on Solvents
PROTECTING EXTERIOR WOOD What Manufacturers Won't Tell You
The 7 Myths of Polyurethane
How To Brush a Finish
Heck, that is enough - it isn't tough to use Google, or go on the Popular Woodworking Magazine website and search for Bob Flexner. And buy the book - you'll be glad you did.
Monday, April 20, 2009
The Sharpie marker as a finishing tool
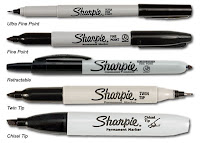 If you've ever had a poster / painting / picture professionally framed, you know what that can cost. But then if you are doing it yourself, the molding choices available most places aren't as good as what is available at the frame shops and what IS available is often pretty expensive and sold by the foot. Another alternative is to buy a pre-made picture frame and use as is, or cut it down to size. Depending on where you buy it, this can be a lot cheaper then professional framing or buying picture frame molding (or any molding for that matter) by the foot. In this case my sister Stephanie had found some nice poster-sized stained black frames that she really liked that were too big for the prints she wanted framed. The frames were shaped, pressed and even a little hand-carved (if I had to guess on how they were produced) which made the profile more than a little irregular. There wasn't a repeat to the pattern which meant that the corners were going to have to be joined somewhat haphazardly. These frames had a black stain with a satin finish over a very light wood. I cut the pieces down to the desired size, but the corner joints were looking pretty ugly - the miters were perfect, but the raw edges exposed the light color wood when I did a dry fit of the pieces. What to do? If I sanded the corners down I would have even more work to do trying to match the stain and finish? Luckily I had the scrap corners of the original frame to look at. When I pulled one apart I was able to see what they did - they had simply painted the end grain black and didn't worry about the surface irregularities of the joint. So, with a large black Sharpie permanent marker, I colored the end-grain edges that might be exposed, while completely avoiding touching the face of the frame pieces, as the colors weren't exact matches. This worked perfectly!
Saturday, April 11, 2009
Free Wood, part 3, WOOD is made of wood

For non-woodturning woodworking you'll need (at a minimum) a thickness planer (and sled) and a shingle froe. Dang, too bad that Lee Valley no longer sells the one pictured. It is the one I have. Well, a right or left handed hatchet (one side of head is completely in one plane, and the helve is offset accordingly) will do the job as well or better for small pieces of straight grained wood. I think a bandsaw (and sled) set up for resawing is really the way to go - will maximize the amount of nice boards you'll get from each piece of wood anyway.
 My point is that there are plenty of ways to get to a workable piece of wood from a piece of firewood. A lot is going to depend on how green / wet the wood is. If the wood has been stored inside for years, you may be able to use it immediately, but any cutting releases tension, so even with dry wood it might be better to wait until you see what the wood is going to do / how it is going to move before you use it.
When I cut the tops off of a couple of holly trees (Ilex aquifolium) I saved the trunks, even though they were fairly small. I used a sled and my thickness planer to get flat sides, my jointer to get a good 90 degree angle and my table saw to start the cuts for quartering it. Lots of wet dust and shavings! Many people wouldn't want wood that wet anywhere near their fine woodworking tools. After I got the wood quartered, I squared it up some and used latex paint to seal the end grain and a couple of inches of each end and stickered it to allow good airflow. In a year or two I'll have some nice white wood. I've done the same with other wood, generally only when I can see that it will have good figure that I don't want to go to waste.
Labels:
Bandsaw,
Drying,
Figure,
Firewood,
Free Wood,
Froe,
green wood,
Holly,
Jointer,
Resawing,
Shingle Froe,
Sled,
Sticker,
Thickness planer
Subscribe to:
Posts (Atom)
