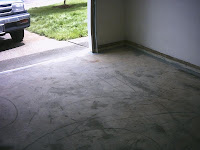
Can you imagine a garage so empty that you could pressure wash it? Only when moving / before moving in, right? Generally you may not go to these extremes, but in this case it was a necessity...
The previous owner had a large number of cats and took care of the cat box problem by making his own giant sized one and putting it in the garage.
Here is how to duplicate his (genius!) process:
1) Make a large frame of 2x6 lumber with a scrap of vinyl flooring for a bottom
2) Put box in the middle of one garage bay
3) Fill it with cat litter and ignore until you move...
So you can see why pressure washing was needed.

Oh! Least I forget - when the garage floor was poured in 1977, kids were allowed to walk, ride bikes, draw and play games like tic-tac-toe in the wet concrete. What fun! The gift of permanent pre-pubescent lithic art!
So what to do about this two pronged problem? A smell better left to the imagination & chasms carved into solid concrete by prehistoric preteen Morlock sub creatures?
The answer to both was sealing the well-defiled floor. There are several DIY epoxy products available on the market. A 2 part, 2 1/2 gallon "pro" epoxy kit sized for the typical two car garage was selected - it also came with colored paint flakes to be sprinkled on the wet paint.

This was the process: Pressure wash the garage floor thoroughly. Be sure to use a very high powered gas pressure washer and run the motor constantly for the entire 1 day rental period. (Get full use of the rental by pressure washing driveway, sidewalks, and curbs.) No other pressure washer is loud enough to allow you to meet your neighbors while making a great first impression! Do avoid hitting the sheet rock on the walls as even a casual flick of the wand will rip a hole right through it. Next, allow the concrete to dry. Attempt to fill cracks, craters and other gouges in concrete with vinyl concrete patch. Abandon fruitless effort (next time fill with liquid epoxy mixed thin enough to self level?) allow to dry, proceed to next step. Mask edges and wood expansion joint between the two car bays. Divide the color chips into smaller quantities to ensure that there will be enough for the entire floor / to make sure coverage is reasonably even. Mix epoxy in 5 gallon bucket. Brush edges, roller epoxy onto floor, spreading color chips as we (Thanks Dad (pictured) and Greg!) painted our way out of the garage.

That is all there is to it! Sure the more aggressive prep methods might be indicated if the floor has a lot of oil or grease embedded, but so far so good! The concrete patch may not have done more than fill the deepest of the gouges, but the epoxy paint and color chips did a pretty good job of camouflaging things. And the overpowering olfactory reminder that the garage was once a temple to the end result of feeding and confining cats? Gone!


No comments:
Post a Comment