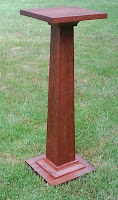
This one happened fairly easily - it isn't a very big project - less than three feet tall, with a top just nine inches on a side.
It started like this: David and I were hanging out in his living room not many days after he proposed to Claire. I mentioned that I would like to make something for him. He said "There is one thing I would like" and brought out a plant stand that was made 90 to 100 years ago by his Great-Grandfather. It was made of Oak, with a fairly dark / darkened finish. I took measurements and made a sketch then and there. And within the week started to work on it. This is the perfect kind of project for a smaller shop craftsman to work on. There is nothing better than building something that your customer can't just buy from a catalog.

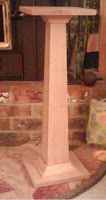
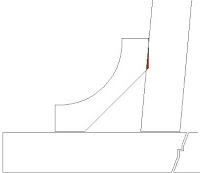
Design: purely dictated by the existing piece I was trying to match. Four tapered boards make up the column, the top and bottom are both made of two boards tongue and grooved into each other. 3/4" Cove molding dressed the top and bottom of the column. Nothing too difficult. The final part was to make two full-size patterns of the tapered pieces - 3 pieces of graph paper taped together for each, with the elongated regular trapezoid shape cut out of each. Why two? The second had to allow for the thickness of the wood of the wider sides. There are four small feet, also wood under the bottom board so that if things do get too wet, the stand won't be sitting too deeply in a puddle. Also note that the top and the bottoms are square to each other and exactly the same nine inches square in size - sure looks like the top is bigger in the photos, huh?

Construction: First stop was
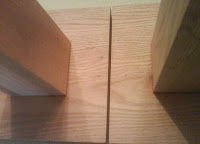
Woodcrafters for the Oak - I had some quartersawn in stock, but wanted grain that came close to approximating the original. So I went looking for relatively small cathedral grain for the wider sides. Woodcrafters obliged. At a bit over 26 inches tall, there isn't a lot of wood in making one of these & after bringing a long board to the desk I was talked out of buying it by the clerk. I was chatting with him about what it was going to be used for and he mentioned that they also had a bunch of shorts available. I went where he directed, and sure enough, found even prettier pieces in the short bin. Once back home (and after I had jointed and thicknessed the wood to 3/4" that I planned for) I laid the larger of the two templates on the wood, looking for the prettiest grain. Once found, I lightly traced the outline on the wood in pencil, and started looking for the rest of the pieces in the wood. Oh! As is obvious from the photo, at some point it was decided that I should make 2 of these stands - someone else saw my sketch & asked if I would make one for them as well. As it isn't twice as hard to make 2 or more of something when you are already set up to make 1, I readily agreed. The photo is interesting because it shows the grain flowing from one stand to the next. As I laid out the tongue and groove tops and bottoms as one long board, it wasn't a surprise for this to happen. Once cut into 4 pieces, I used the prettiest two for tops - what you see are the less visible bottoms, which are even less visible with the molding applied.

One good trick to share for cutting - the angle of each side is just 2 degrees. I used a
Wixey digital angle gauge to do a couple of the cuts - I zeroed the gauge my tablesaw top, then I laid my angle cut jig on its side on the tablesaw, and adjusted it until it read exactly 2 degrees. This technique would work for any taper cut such as table legs. Kinda cool for those times when the eyeball alone isn't good enough. A related tip - the battery in the Wixey is the same size used by LED tea-lights. So, if your battery dies it might be cheaper to buy a pack of those for a dollar or two than a replacement battery alone for Six dollars!
Most of the angle cuts were done with a template and carpet tape as most of the grain I wanted wasn't aligned in any way with a board edge. Assembly was relatively straightforward - using offcuts as clamping cauls, Titebond III for the glue up, etc.

The only tricky part was back-sanding the molding to conform to the column taper. This was only necessary for the molding on the bottom. Finished with tinted water-based Poly (it is a plant stand, it Is going to get wet) in a reasonably close shade, covered with a clear gloss water-based Poly of the same brand. I also made sure I turned the project over and sealed the feet and bottom of this stand too. If there is the slightest chance of it ever standing in a puddle, it may as well have a fighting chance. I rubbed out that final clear coat with very fine steel wool to give it more of a semi-gloss finish. A simple but attractive stand. My hats off to David's Great-Grandpa!
 One good trick to share for cutting - the angle of each side is just 2 degrees. I used a Wixey digital angle gauge to do a couple of the cuts - I zeroed the gauge my tablesaw top, then I laid my angle cut jig on its side on the tablesaw, and adjusted it until it read exactly 2 degrees. This technique would work for any taper cut such as table legs. Kinda cool for those times when the eyeball alone isn't good enough. A related tip - the battery in the Wixey is the same size used by LED tea-lights. So, if your battery dies it might be cheaper to buy a pack of those for a dollar or two than a replacement battery alone for Six dollars!
 The only tricky part was back-sanding the molding to conform to the column taper. This was only necessary for the molding on the bottom. Finished with tinted water-based Poly (it is a plant stand, it Is going to get wet) in a reasonably close shade, covered with a clear gloss water-based Poly of the same brand. I also made sure I turned the project over and sealed the feet and bottom of this stand too. If there is the slightest chance of it ever standing in a puddle, it may as well have a fighting chance. I rubbed out that final clear coat with very fine steel wool to give it more of a semi-gloss finish. A simple but attractive stand. My hats off to David's Great-Grandpa!


No comments:
Post a Comment